There is no one I love to show love to more than my husband. I have been very happily married for almost 3 years now. All three of those years my husband has been a full-time student and usually working. In June, my husband graduated from Cal Poly Pomona with a Bachelors in Electrical Engineering, emphasis in control systems (robotics) and power. I don't know if words can really explain how excited, relieved, ecstatic, etc. I was. It was difficult having such inconsistent schedules that changed every 10 weeks, his overnighters in the lab, and inability to commit to many plans because of his homework load, plus I just missed him a lot. I am so proud of him and all his hard work at school, whilst being the best husband!

Well, I was SO excited I started brainstorming his graduation party six months early, scouring the Internet and Pinterest for ideas. In December, he had a robotics lab where his team had to design and build a robot to compete against other teams in tug-o-war, hide-and-seek, etc. You will see it later in this post. This is when my epiphany for a robot-themed graduation party came into place. I became a little robot obsessed the weeks leading up to it. Before I go into all the details, I want to thank my family for all the help they provided prior to and day of the party. I couldn't have done it without you!
Detail #1: Invitation
My wonderful husband helped me design the invitation on Adobe Illustrator.
Detail #2: Entrance
Since I had people walk through the side of the house to the back yard where the party was held and wanted to spruce it up. I made a banner that read "You are now entering Nate's Graduation Party...processing excitement." I had found different fonts online that looked robot-like and did my best to make the sign look futuristic. I penciled it all first, using rulers, sharpees, and being a little OCD for the top and bottom fonts. The other two I used acrylic paints. Last Christmas, we found a giant roll of butcher paper that we use for gifts and it worked perfectly for the poster.
Also at the entrance, were two greeter robots that my dad had made (he had way too much fun).

Guest blogger: Tim Bohn
For the little guy I started with my parents old shredder. My dad brought it over along with the blue bowls and funnel hat and that was the genesis. For the arms I bought some flexible tubing that might get used for an exhaust fan, and put some gloves on the ends for his hands. For the head I screwed one bowl into the "body", then using the spring clip "ears" that held the two bowls together for the head. A couple rubber things from some Toro pop-up sprinklers and two old car tail-light bulbs painted red makes the eyes. The nose is an old electrical conduit elbow. I put some black electrical tape and glued two little electrical connectors for the teeth/fangs. Depends on whether you consider him buck-toothed, or a vampire :) Put a funnel on his top, ala the Tin-Man, and curl up a few pieces of wire for some hair and you're done.
The bigger one took quite a bit more time. Starting at the feet, a couple square boxes taped together, then painted gold made up the two feet. The legs were larger flexible tubing and the arms smaller flexible tubing. The legs weren't stable enough so I put a cardboard tube into the feet and the flex tubing over the tube. So the flex tubing is more for show. I put some rocks in the feet to weigh them down. I taped a couple clamps into the arm tubing for the "hands". A tuna can was used for the neck. The top of the box making up the body was a little soft, so I reinforced with a thin piece of wood on the top. That way I could screw the can for the neck into it and the head into the neck. The eyes are some large kids erasers, the ears some different erasers along with a couple florescent light bulbs. I put a couple light fixture pieces inside the head to screw the bulbs into to make them tight. The nose is a hose nosel, and the mouth is a piece of flex conduit glued on. It's hard to see, but I have holes running through the back of one foot, up through the body, through the neck and head. I ran a string of mini-lights from the Christmas tree up through them and punched individual lights out in the shape of a heart in the body, and punched two out in the middle of the eyes. They looked a lot better when the sun went down. I put the lights on a mode where they pulsed on and off. Made it look like a beating heart and flashing eyes.
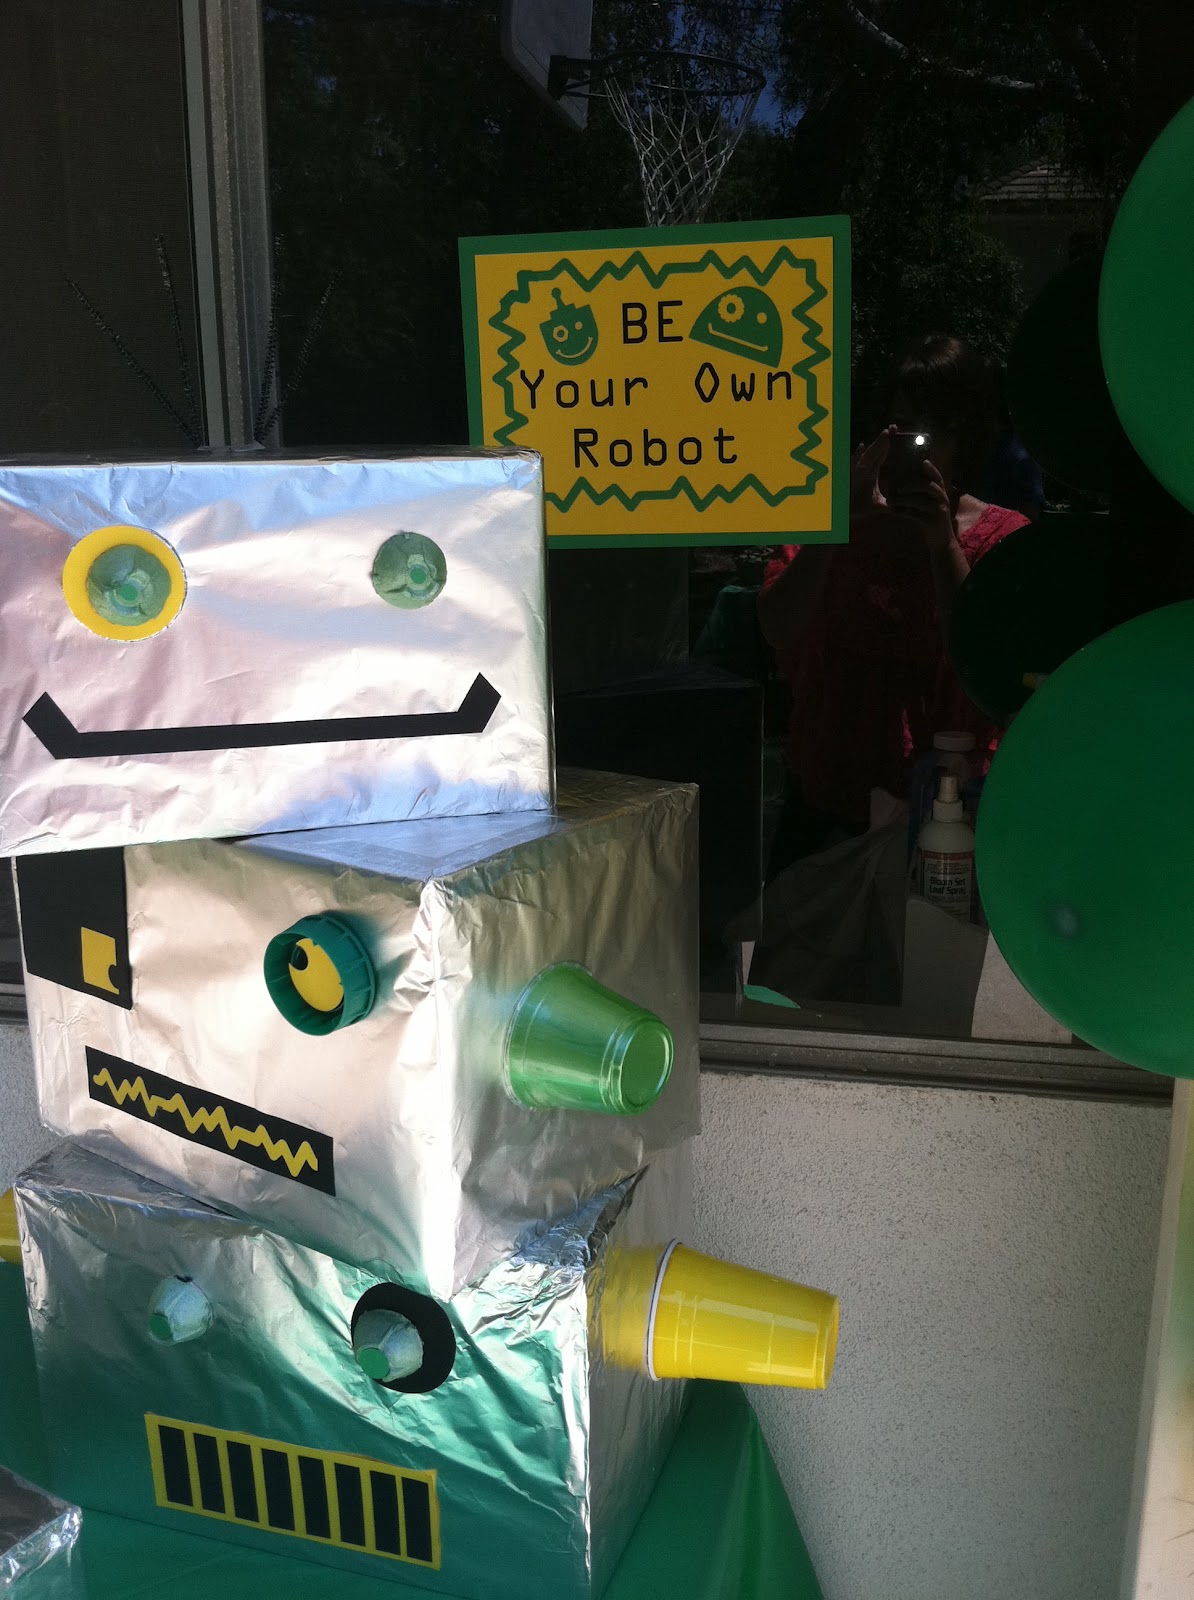
Detail #3: Photo booth
I loved every little detail of this party but this was possibly my favorite. As people walked into the backyard, there was a table with cardboard robot heads for them to pose in front of a camera on a tripod.
The heads were cardboard boxes covered in foil. I hot glue gunned egg cartons, plastic cups, and juice tops for eyes and ears, and card stock for the rest. Nate's best friend also used foam board to create cut outs for people to put their heads through (see below). This was really nice because they could adjust to any height, people just picked them up and put their face through. I made a sign that said "BE your own robot." I printed the lettering and used the Robot Party Cricut cartridge for the embellishments. You will see that I used it a lot!
For the background I had a tall canvas room separator that I put silver fabric over. I then used a needle and thread to string balloons. I only bought one packet of each color and it didn't quite fill it up all the way, but most of the pictures are above the hips anyway.
The "GOOD JOB NATE" banner was created using the Cricut also. I used the Birthday Bash cartridge for the pennants and Accent Essentials for the yellow gear-like circles.
On the table that housed the photo booth props I made an extra robot head and used an exacto knife to cut a space for people to drop their cards in.
Everyone really had a fun time with these. We took two pictures of each group. One with the heads completely on and one with them peeking out from underneath. That way you know who it is.
Detail #4: Tree decor
I used the Paper Lace 2 Cricut Cartridge to cut out a bunch of 12' card stock green and yellow gears to hang in the trees. I also used the Robot Party cartridge to cut out robot heads to hang (see below). This added a lot to the color and theme in the yard.
Detail #5: Nate's Achievement Station
A couple weeks before his graduation, Nate asked if he could borrow my Cricut to do his senior project board. Of course, I was so proud that he wanted to use it :) After many hours, he came home with a only the title (which looked GREAT). So that night I cut out all of the background gears and robots. I made sure after his presentation that he asked his teammates if he could keep the board since it just happened to match the party colors.

I really wanted people to see why I was so proud of him. His senior project (in my terms) controlled the orientation of a satellite in space where there is no gravity. He is so smart! He/we gave up many weekends for this project. In the center of the table is the robot I discussed at the top for a lab. There is also another board to the left that he designed and programed for a lab. We put up his diploma (which has fallen over in this pic), some of his books, his alumni license plate frame, and his cap and tassel (hanging on the top right of the board).
Detail #6: Bathroom Details
I wanted to make a sign so that I wouldn't be asked all day where the restrooms were and I wanted it to sound "robot-y." I used the Accent Essentials Cricut cartridge for the arrow.
I believe I had seen this idea somewhere on Pinterest. I was really sad because my white window marker was dry when I tried to do this. Luckily, we found an expo marker that worked great! Only a special few saw this though.
Detail #7: Centerpieces
For centerpieces, I used cardboard boxes to make robots and heads for people to write their congratulations on while sitting. I used scraps for the most part to make their faces. There were sharpie markers on each table for signing. Warning: Be careful if it is sunny. You can get a nasty glare.
Detail #8: Design Your Own Robot Station
As another activity, I printed blank boxes on card stock as a base for people to create a robot. I used a stake from Lowes to put up the signs. I again used the Robot Party and Paper Lace 2 Cricut cartridges for make the poster.
I had silver tin trays filled with foam pieces and cans with green and yellow ribbon around them filled with crayons.
I got green pails in the Target dollar section and used a foam piece to label it trash.
The little ones had fun with it...
but I think the grown ups loved it more!
I tied twine around the tree and allowed people to display their art work.
Detail #9: Binary Banner
Since my husband does programming and is a self proclaimed nerd, I figured it was only appropriate to tell him CONGRATS in binary code. Of course, he had to give me all the numbers. I did the green triangles that spelled out "congrats" using Birthday Bash cartridge for the pennants and Simply Sweet cartridge for the font. For the numbers, I printed them out on the yellow card stock and cut each sheet into 4s. I learned that each letter is coded by 8 numbers. This added up to 64 rectangles. Very tedious! I then cut the green strips for each number.
Coming soon in part 2... all the food details for a robot party!